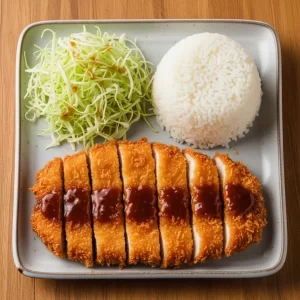
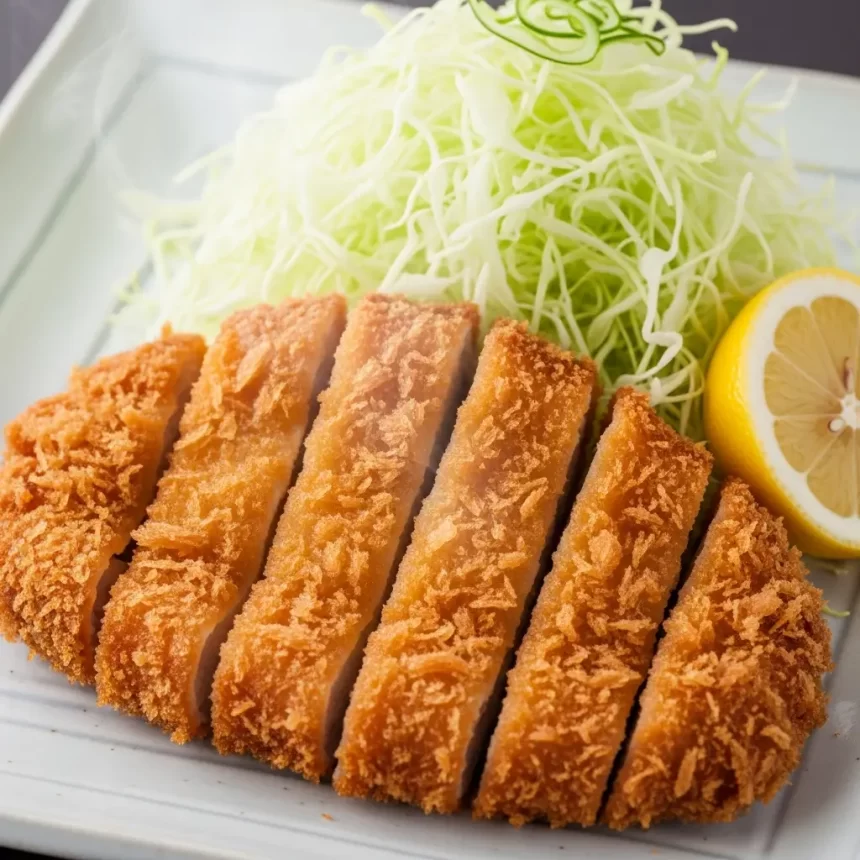
There’s something undeniably satisfying about the first bite of crispy Japanese Chicken katsu: that perfect harmony of crunchy golden exterior giving way to tender, juicy chicken inside. This beloved dish, a staple in Japanese comfort food, has captured the hearts and taste buds of food lovers around the world. Whether you’re a seasoned cook or a curious kitchen adventurer, mastering Chicken Katsu at home brings a delightful blend of simplicity and flavour that’s sure to impress. In this step-by-step recipe guide, we’ll unravel the secrets to achieving that impeccable crispiness and authentic taste, transforming yoru dinner into a savory celebration inspired by Japan’s rich culinary tradition.
Crispy Japanese Chicken Katsu is a harmonious blend of crunchy texture and tender, juicy meat-a dish that never fails to delight. Originating from Japan, this fried chicken cutlet is a staple comfort food, known for its perfectly crisp exterior balanced with a tender interior. Whether served in a bento box or alongside a steaming bowl of rice, mastering this recipe transforms any meal into an extraordinary culinary experience. Let’s dive into the secrets behind achieving that unbeatable crispiness and golden hue that make this dish truly unforgettable.
Prep and Cook Time
Total Time: 45 minutes
Yield
Serves 4 generous portions
Difficulty Level
Medium – Perfect for home cooks looking to elevate their frying skills
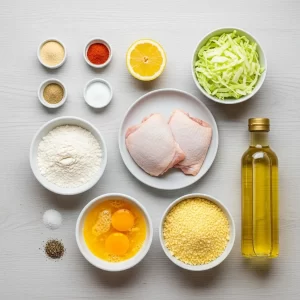
Ingredients
- 4 boneless, skinless chicken thighs (about 6 oz each), pounded to ½ inch thickness
- 1 cup all-purpose flour, sifted
- 2 large eggs, beaten
- 1 ½ cups panko breadcrumbs
- Salt and freshly ground black pepper, to taste
- 1 tsp garlic powder
- 1 tsp smoked paprika
- Vegetable oil or canola oil for frying, about 2 cups
- Optional: Tonkatsu sauce for serving
- Garnishes: lemon wedges, finely shredded cabbage, chopped parsley
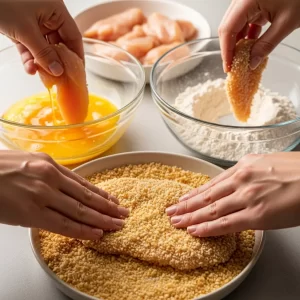
Instructions
- Prepare the Chicken: Pat the chicken thighs dry with paper towels. Season both sides thoroughly with salt, pepper, garlic powder, and smoked paprika for an extra layer of flavor.
- Set Up Your Breading Station: arrange three shallow dishes: one with flour, one with beaten eggs, and the last with the panko breadcrumbs. Ensure panko is fresh for maximum crunch.
- Bread the Chicken: Dredge each piece first in flour, tapping off the excess. next, dip into the beaten eggs, letting the excess drip back into the bowl. coat the chicken evenly with panko breadcrumbs, pressing gently to adhere a generous layer.
- Chill Before Frying: Let breaded chicken rest on a wire rack in the fridge for 10-15 minutes; this helps the breading set and prevents it from slipping during frying.
- Heat the Oil: in a deep, heavy-bottomed skillet or Dutch oven, heat oil to 350°F (175°C). Use a thermometer to maintain consistent temperature for even cooking and to avoid greasiness.
- Fry the Chicken: Carefully lower the chicken into hot oil, frying 2 pieces at a time to avoid overcrowding. Cook each side about 4-5 minutes until golden brown and crispy. Use tongs to flip gently.
- Drain and Rest: Transfer cooked chicken to a paper towel-lined tray to remove excess oil. Let rest 5 minutes before slicing; this seals the juices and keeps the crust crisp.
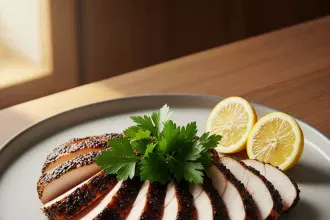
- Slice and Serve: Cut chicken katsu into strips across the grain for an irresistible presentation.
Tips for Success
- Choose boneless, skinless chicken thighs over breasts for juicier meat that stands up well to frying.
- Pounding to uniform thickness ensures even cooking and tender texture.
- Fresh panko breadcrumbs are crucial-stale panko will yield a less crisp crust.
- Maintain oil temperature between 340°F and 360°F throughout frying to prevent sogginess or burning.
- Let breaded chicken chill on a wire rack before frying to help the coating stick better.
- For extra flavor, mix a teaspoon of dashi powder or seaweed flakes into your panko breadcrumbs.
- Use this guide on frying temperatures to master your oil heat control.
Serving Suggestions and Customizing Your Chicken Katsu Experience
The classic way to enjoy your Crispy Japanese Chicken Katsu is atop a bed of steaming white rice accompanied by finely shredded cabbage tossed lightly in a tangy dressing. Drizzle generous swirls of sweet and savory tonkatsu sauce for the authentic flavor kick. for a modern twist, serve chicken katsu with a side of pickled vegetables or atop a fresh salad dotted with sesame seeds.
To elevate the experience, try garnishing with a squeeze of lemon or a sprinkle of toasted sesame seeds and scallions for color and brightness.Pair with a chilled glass of Japanese beer or green tea for a harmonious meal.
Nutritional Details
| Nutrient | Per Serving |
|---|---|
| Calories | 420 |
| Protein | 35g |
| Carbohydrates | 28g |
| Fat | 18g |
For more japanese-inspired comfort dishes, check out our Japanese Curry Rice recipe, another favorite that pairs beautifully with chicken katsu.
Q&A
Q&A: Crispy Japanese Chicken Katsu – A Step-by-Step Recipe Guide
Q1: What is Chicken Katsu and where does it come from?
A: Chicken Katsu is a beloved Japanese dish featuring succulent chicken breast coated in a golden, crispy breadcrumb crust. Originating from Japan,it’s a local adaptation of Western-style breaded cutlets,known as “katsu,” which means “cutlet” in Japanese. It’s become a staple comfort food, adored for its crunchy exterior and juicy interior.
Q2: What makes chicken Katsu so crispy?
A: The secret to irresistibly crispy Chicken Katsu lies in the breading technique. First, the chicken is dredged in flour, then dipped in beaten egg, and finally coated with panko breadcrumbs – Japanese-style crumbs that are lighter and airier than regular breadcrumbs. This unique coating fries up crispier and less greasy, giving you that satisfyingly crunchy bite.
Q3: Do I need special ingredients to make authentic Chicken Katsu?
A: While the star ingredient is the panko crumbs, which can be found at most Asian or international grocery stores, the other ingredients are everyday staples: chicken breast, flour, eggs, and oil for frying. For serving, Katsu sauce-a tangy and slightly sweet condiment-is essential to complete the authentic experience. You can find bottled Katsu sauce or make your own with Worcestershire sauce,soy sauce,and a dash of honey.
Q4: How do I prepare the chicken for Chicken Katsu?
A: start by pounding the chicken breasts to an even thickness (about 1/2 inch). This not only tenderizes the meat but ensures even cooking. After seasoning with salt and pepper,coat the chicken in flour,making sure it’s lightly dusted to help the egg adhere. Next, dip it in beaten eggs followed by a generous coating of panko breadcrumbs, pressing gently so thay stick well.
Q5: What’s the best method for frying Chicken Katsu?
A: Heat oil in a deep skillet or frying pan to around 350°F (175°C). Use a neutral oil with a high smoke point, like vegetable or canola oil. Fry the breaded chicken pieces until they’re a lovely golden-brown, about 3-4 minutes per side, depending on thickness. Avoid overcrowding the pan to maintain oil temperature and ensure crispiness. Drain on paper towels to absorb excess oil.
Q6: Can I bake Chicken Katsu rather of frying?
A: Absolutely! For a healthier twist,bake the breaded chicken on a wire rack over a baking sheet at 425°F (220°C) for about 15-20 minutes,flipping once halfway through. spritz with a little oil to encourage browning and crisp texture. While baking won’t replicate the exact crunch of frying, it gets surprisingly close and keeps things lighter.
Q7: What should I serve with Chicken Katsu?
A: Traditionally, Chicken Katsu is served with shredded cabbage, steamed white rice, and a generous drizzle of Katsu sauce. For added flair, pickled vegetables or miso soup make perfect accompaniments. Feel free to pair it with a side salad or even a bowl of udon noodles to turn it into a hearty meal.
Q8: Any tips to elevate my Chicken Katsu game?
A: Sure! Marinate your chicken briefly in a little soy sauce and ginger for subtle flavor depth before breading.Use fresh panko for maximum crunch. Fry in small batches to keep oil hot and crisping evenly. And don’t forget the sauce – a homemade Katsu sauce with balanced sweet, tangy, and savory notes really ties the dish together.
Q9: How can I store and reheat leftovers?
A: Store leftover Chicken Katsu in an airtight container in the fridge for up to 2 days. for reheating, pop it in a preheated oven at 375°F (190°C) for 10 minutes to refresh the crispiness without drying the meat. Microwave reheating tends to soften the crust, so use that only if you’re in a pinch.
Q10: Why is Chicken Katsu so popular worldwide?
A: Chicken Katsu perfectly marries simple ingredients with satisfying textures – crispy outside, tender inside – and a flavor profile that’s both comforting and versatile. Its approachable cooking method and irresistible crunch have won hearts far beyond Japan, making it a global favorite and a testament to the magic of Japanese comfort food.
The Way Forward
With every crunch of this crispy Japanese Chicken Katsu, you’re not just enjoying a meal-you’re savoring a beloved tradition, crafted with care in your own kitchen. Armed with this step-by-step guide, you now have the tools to recreate that perfect golden crust and tender, juicy interior anytime you crave a taste of Japan. Whether served with a drizzle of tangy tonkatsu sauce or nestled alongside fluffy rice and shredded cabbage, this dish promises comfort and satisfaction in every bite. So,roll up your sleeves,gather your ingredients,and let the sizzling symphony of Chicken Katsu bring a little crispy magic to your dining table. happy cooking!