Few things satisfy a sushi craving quite like the fresh, vibrant flavors of salmon, but rolling delicate sushi at home can be a daunting task. Enter the salmon sushi bake: a brilliantly simple, crowd-pleasing dish that captures all the deliciousness of traditional sushi without the fuss. This foolproof recipe layers tender salmon, perfectly seasoned rice, and creamy, savory toppings into a warm, golden casserole that’s as effortless to make as it is indeed irresistible to eat. Weather you’re a sushi novice or just looking for a fresh spin on a classic favorite, this salmon sushi bake promises a flavorful adventure with minimal prep and maximum taste. Let’s dive into this easy, crave-worthy recipe that turns sushi night into a cozy, home-cooked celebration.
Deliciously Simple salmon Sushi Bake captures the heart of comfort food by fusing the irresistible warmth of baked dishes with the elegant, fresh flavors of sushi.Originating as a homestyle twist on traditional sushi rolls, this layered casserole delivers all the umami-rich goodness of salmon and seasoned rice in an easy-to-share format perfect for family dinners, potlucks, or casual gatherings. The creamy, tangy topping and crispy golden crust make every bite feel indulgent yet approachable, creating an unforgettable experience that’s equally satisfying year-round or for special celebrations.
Prep and Cook Time
- Prep Time: 15 minutes
- Cook Time: 25 minutes
- Total Time: 40 minutes
Yield
- Serves 6 to 8 generous portions
Difficulty Level
- Easy – Perfect for beginners and busy home cooks
Choosing the perfect Ingredients for a Flavour-packed Salmon Sushi bake
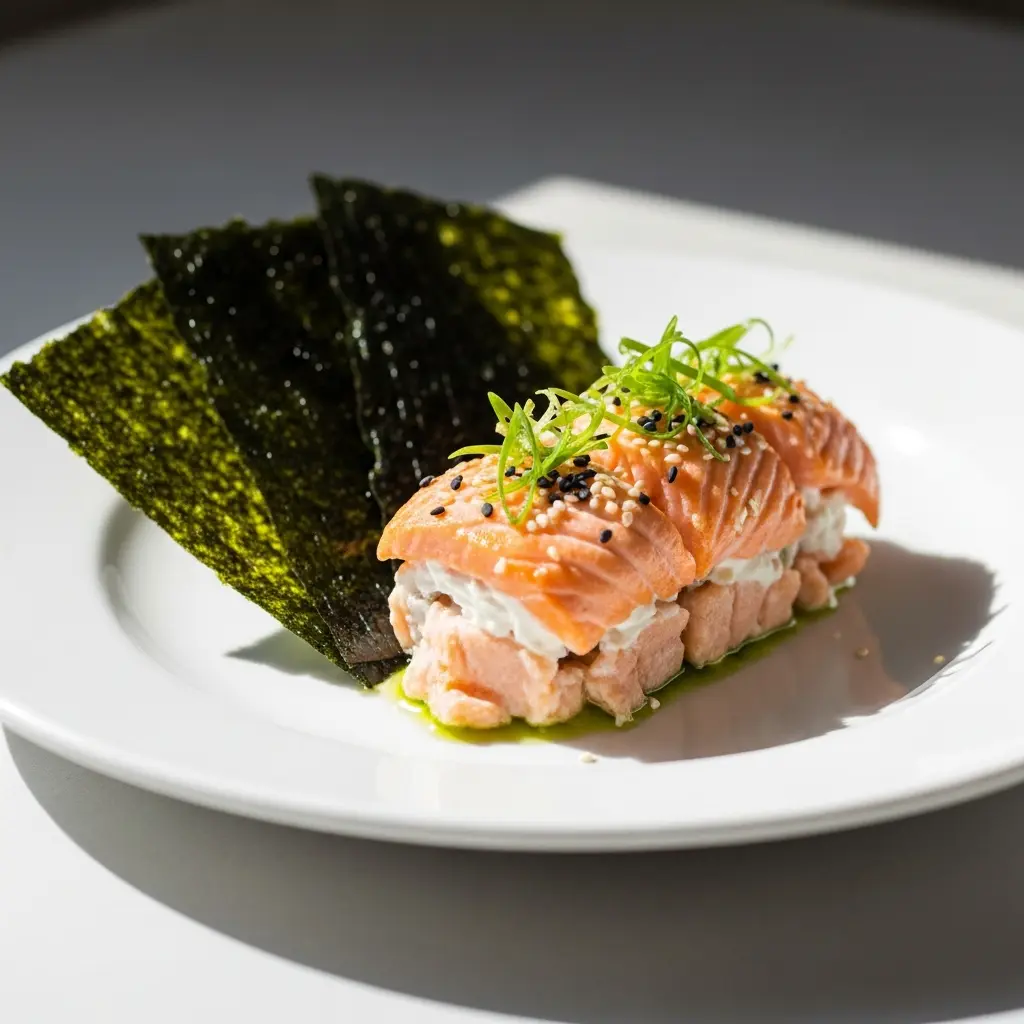
At the core of a appetizing salmon sushi bake are fresh, high-quality ingredients that bring vibrant, balanced flavors to the dish. Opt for fresh salmon fillets with a buttery texture rather than frozen or smoked varieties. Sushi-grade or fresh wild-caught salmon will enhance not only the taste but also the texture,keeping the bake moist and silky inside. For the rice, use short-grain sushi rice seasoned with rice vinegar, sugar, and salt to achieve that characteristic subtle tang and stickiness that holds layers together beautifully.
The creamy top is traditionally made with Japanese mayo, which adds richness and depth without overpowering salmon’s subtle sweetness. A splash of sriracha or masago (fish roe) can introduce exciting bursts of heat and umami, helping this comfort food shine on every plate. Don’t forget the essential nori sheets or seaweed snacks layered underneath for a hint of oceanic fragrance and crunch.
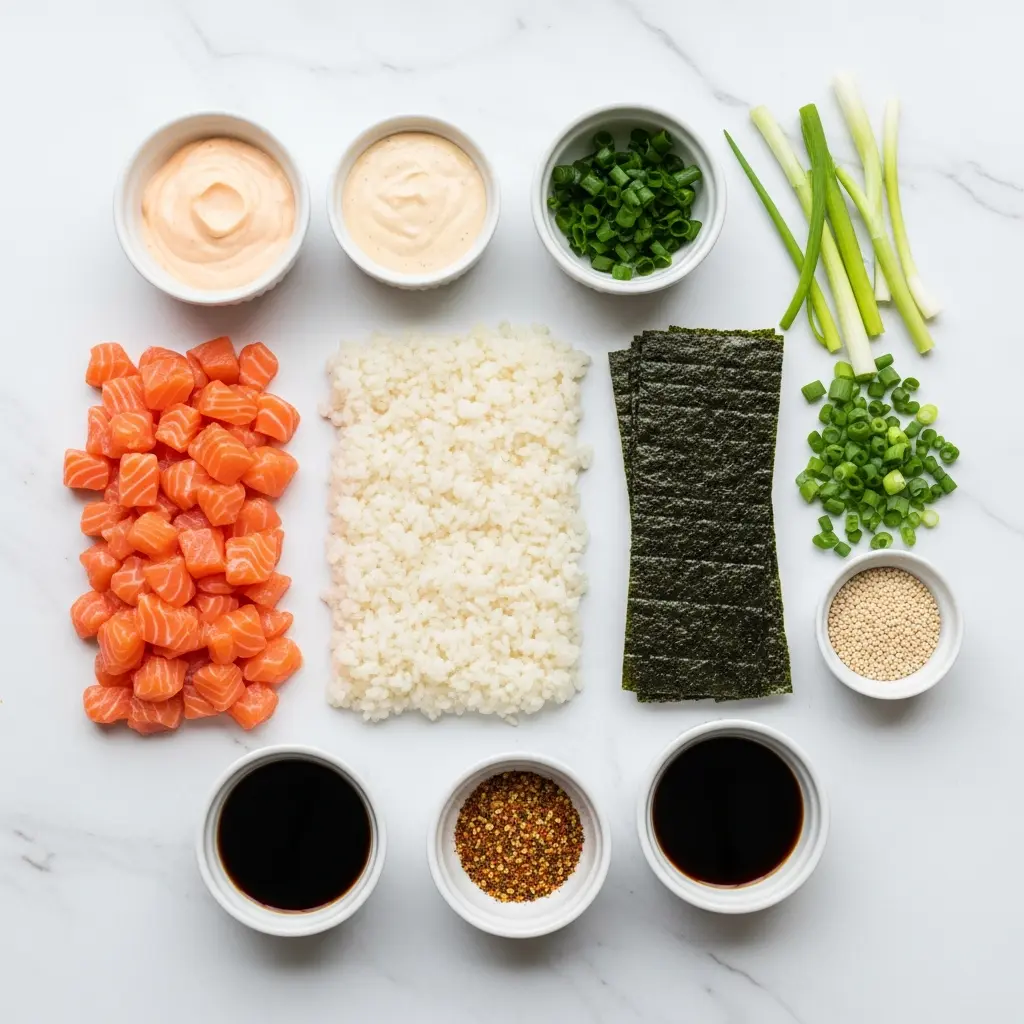
Ingredients
- 2 cups sushi rice, rinsed and cooked
- 2 1/2 cups water (for cooking rice)
- 1/4 cup rice vinegar
- 2 tablespoons sugar
- 1 teaspoon salt
- 1 lb fresh salmon filet, skin removed and cut into bite-sized pieces
- 1/2 cup Japanese mayonnaise (Kewpie)
- 2 tablespoons sriracha sauce (adjust to taste)
- 1 teaspoon soy sauce
- 4 sheets nori, cut into strips
- 2 green onions, thinly sliced
- 1 tablespoon toasted sesame seeds
- Optional garnish: masago (fish roe), pickled ginger, and extra sliced green onions
- Non-stick cooking spray or oil for greasing the baking dish
Step-by-Step Guide to Crafting a Moist and Delicious Sushi Bake
- prepare the sushi rice: Rinse the sushi rice under cold water until the water runs clear. Combine with 2 1/2 cups water in a rice cooker or pot.Cook according to package instructions until tender and fluffy. While still hot, gently fold in the rice vinegar, sugar, and salt mixture. Set aside to cool slightly.
- Preheat the oven: Set your oven to 375°F (190°C) and lightly grease a 9×9-inch baking dish with non-stick spray or oil.
- Prepare the salmon: Cut the fresh salmon into bite-sized pieces. In a medium bowl, mix the salmon with soy sauce and half the sliced green onions for a light marinade.
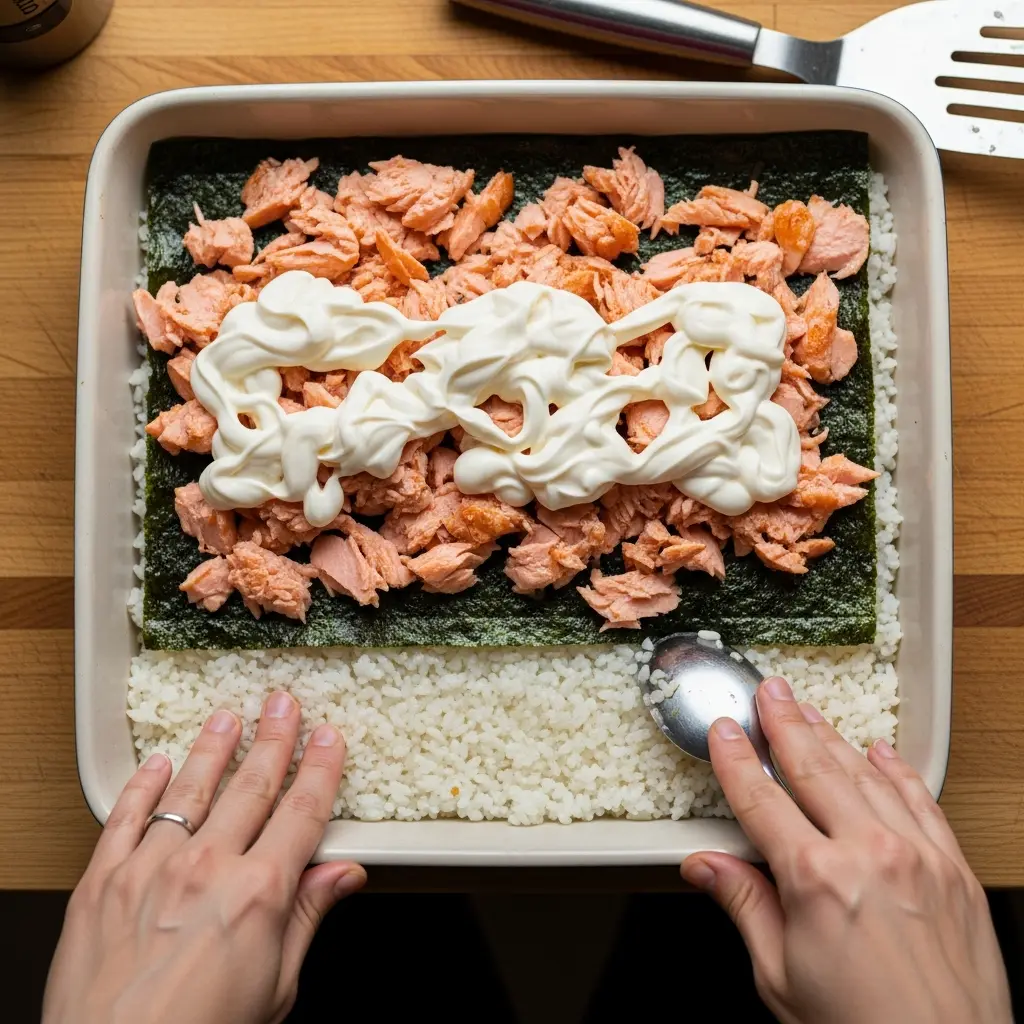
- Arrange the layers: Lay down half the cooked sushi rice evenly in the baking dish, gently pressing it down. Place the nori strips evenly over the rice layer, creating subtle pockets of salty crunch.
- Add the salmon: Spread the marinated salmon pieces evenly over the nori layer, then top with the remaining sushi rice, pressing it down firmly but gently.
- Prepare the topping: In a small bowl,combine the Japanese mayonnaise and sriracha sauce,adjusting the heat level to your preference. Spread this spicy mayo mixture evenly on top of the rice layer.
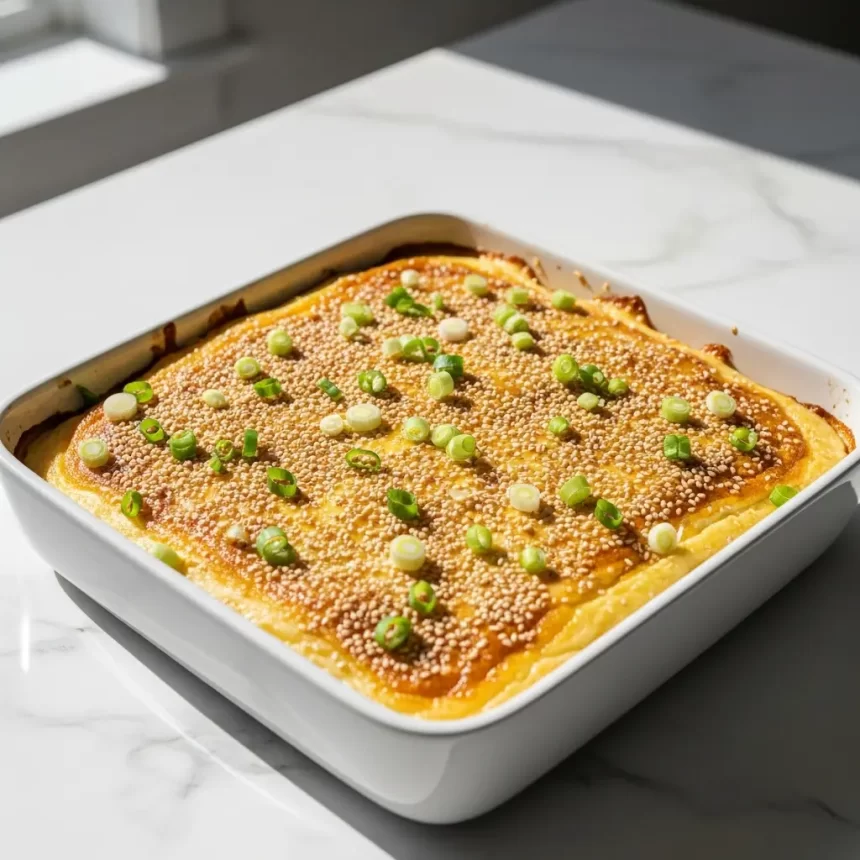
- bake: Place the dish in the oven and bake for 20 to 25 minutes, or until the spicy mayo topping looks golden and slightly bubbly, and the salmon is cooked through but still moist.
- Garnish and serve: Remove from oven and sprinkle with toasted sesame seeds, remaining green onions, and optional masago or pickled ginger for added texture and flavor contrast.
Expert Tips for Customizing your Salmon Sushi Bake to Suit Every Palate
- Spice levels: Adjust the sriracha in the mayo topping or swap it out for wasabi mayo to create a sharper kick. Consider omitting for a kid-kind version.
- Seafood variations: Substitute salmon with cooked shrimp, crab meat, or smoked salmon for different textural layers and flavor profiles.
- Make it vegetarian: Replace salmon with layers of grilled mushrooms, avocado, and cucumber for a plant-based twist.
- Rice alternatives: For a lower-carb option, try cauliflower rice seasoned with the classic sushi vinegar mixture.
- Prepping ahead: Assemble the salmon sushi bake the day before and refrigerate, then add the mayo topping and bake just before serving for convenience without losing freshness.
Serving Suggestions
Serve your salmon sushi bake hot, accompanied by crisp cucumber salad, pickled ginger, and extra soy sauce for dipping.Arrange with slices of avocado or fresh lime wedges to brighten the rich flavors. Pair with a chilled glass of sake or a dry white wine for an authentic sushi experience elevated by warmth and heartiness. This dish pairs beautifully with light miso soup or crunchy seaweed salad to create a balanced, satisfying meal perfect for gatherings or a cozy weeknight indulgence.
| Nutritional Info (per serving) | Calories | Protein | Carbs | Fat |
|---|---|---|---|---|
| Salmon Sushi Bake | 350 kcal | 22 g | 38 g | 12 g |
For more seafood-inspired comfort dishes, check out our Easy Seared Salmon. Learn more about seafood health benefits at FDA’s official seafood advice.


Q&A
Q&A: Deliciously Simple Salmon Sushi Bake – A Foolproof Recipe
Q1: What exactly is a salmon sushi bake?
A1: Think of salmon sushi bake as the coziest, warm cousin of traditional sushi. It’s a casserole-style dish that layers sushi rice, tender salmon, creamy mayo, and a medley of flavorful toppings-baked to golden perfection. It captures all the essence of sushi without the intricate rolling and raw fish prep, making it perfect for home cooks craving sushi vibes with fuss-free ease.
Q2: Why should I try making salmon sushi bake at home?
A2: Because it’s unbelievably simple, delicious, and versatile! It requires minimal ingredients, no fancy equipment, and is ideal for feeding a crowd or meal-prepping. Plus, it’s a crowd-pleaser that elevates everyday ingredients into a comforting, layered delight bursting with umami.
Q3: Can I use other types of fish or seafood instead of salmon?
A3: Absolutely! While salmon’s buttery richness is iconic here,you can swap in cooked shrimp,crab meat,or even tuna. Just keep in mind the cooking times and textures might vary slightly, but the concept remains delightfully flexible.
Q4: Is it necessary to use sushi rice, or can I substitute regular rice?
A4: Sushi rice definitely enhances the authenticity with its sticky, slightly sweet profile that holds together beautifully. However, in a pinch, short-grain or medium-grain rice can work, though it won’t quite have that classic sushi bite.
Q5: How do I avoid overcooking the salmon in the bake?
A5: aim for tender, just-cooked salmon by baking at a moderate temperature-around 350°F (175°C)-and keep an eye on the dish during the final minutes. The salmon will continue to gently cook once out of the oven as it rests, preserving moistness and flaky texture.
Q6: What toppings elevate a salmon sushi bake from simple to spectacular?
A6: Think vibrant! Sliced scallions, crunchy ikura (salmon roe), toasted sesame seeds, avocado slices, or a drizzle of spicy mayo can add complexity and texture. Nori strips or furikake seasoning sprinkle an extra punch of that beloved oceanic flavor.
Q7: How do I serve salmon sushi bake for the best experience?
A7: Serve it hot, straight from the oven.Scoop portions onto plates and offer nori sheets or crispy wonton chips for that fun DIY sushi hand-roll feel. Pair it with a side of pickled ginger or wasabi for an added kick.Q8: Can I prepare salmon sushi bake ahead of time?
A8: Yes! You can assemble the bake a few hours-or even the day before-keep it refrigerated, then bake fresh before serving.Leftovers reheat well,too,making for an excellent next-day meal that tastes just as comforting.
Q9: Is this recipe suitable for beginners in the kitchen?
A9: Without a doubt.Its layered approach eliminates tricky sushi techniques, keeping the process straightforward. Even culinary newbies will impress friends and family with this “foolproof” dish that looks gourmet but feels like home cooking.
Q10: Any tips for making this recipe even more delicious?
A10: Use fresh, high-quality salmon for the best flavor. Mix a little wasabi into the mayo for a spicy twist, or add finely diced cucumbers for crunch. Lastly, be generous with the cheese topping-it melts into creamy gold that unites all the flavors beautifully.
Ready to dive into this irresistible salmon sushi bake? With this Q&A in hand, you’re set to create a sushi-inspired masterpiece that’s both approachable and mouthwatering!
Closing Remarks
Whether you’re a sushi novice or a seasoned seafood lover, this Deliciously Simple Salmon Sushi Bake offers the perfect blend of ease and elegance. With its layers of tender salmon, creamy rice, and savory seasonings baked to golden perfection, it’s a foolproof way to enjoy sushi flavors without the fuss. So next time you crave that irresistible umami kick, remember this recipe-your shortcut to sushi satisfaction that’s as comforting as it is indeed crave-worthy. Happy baking, and even happier eating!