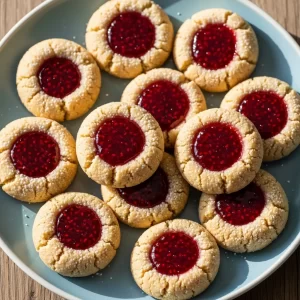
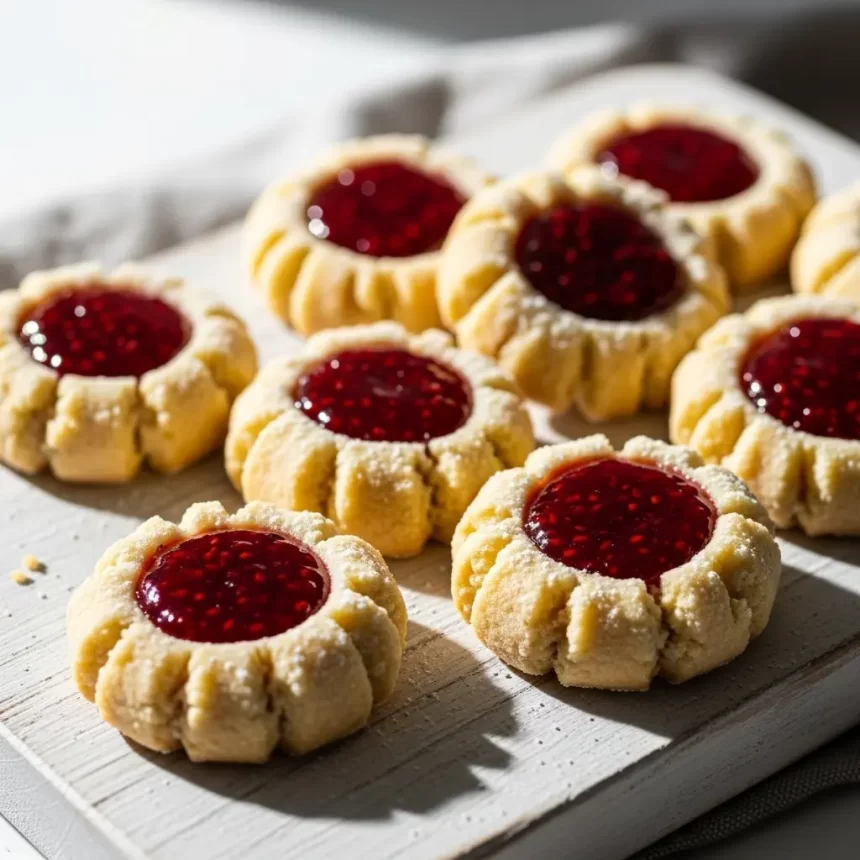
There’s something irresistibly charming about thumbprint cookies-the delicate indentations filled with luscious jam, the crumbly texture that melts in your mouth, and the nostalgic comfort they bring bite after bite. But what if you’re navigating the world of gluten-free baking? Fear not. In “Perfectly Sweet: A Guide to Gluten-Free Thumbprint Cookies,” we’ll unlock the secrets to creating thes timeless treats without a trace of gluten. Whether you’re gluten-sensitive, baking for loved ones, or simply craving a new twist on a classic, this guide blends artistry and science to help you craft cookies that are every bit as delightful, tender, and sweet as the originals. Ready your mixing bowls-your perfect gluten-free thumbprint cookie adventure begins here.
Perfectly Sweet thumbprint cookies are a delightful celebration of tender, crumbly gluten-free dough paired with luscious fillings that burst with flavor in every bite. Mastering the art of selecting the finest gluten-free flours transforms these cookies from ordinary to unusual, ensuring a texture that’s both tender and satisfyingly crumbly. Whether you’re drawn to the classic fruit preserves or eager to experiment with rich nut butters, these versatile treats awaken your creativity and satisfy your sweet tooth-all without gluten.
Prep and Cook Time
- Prep Time: 20 minutes
- Chill Time: 30 minutes
- Cook Time: 12-15 minutes
- Total Time: 1 hour
Yield
Approximately 24 cookies
difficulty Level
Easy to Medium
Ingredients
- 1 cup gluten-free all-purpose flour blend (sifted, preferably with xanthan gum included)
- ½ cup almond flour (for added moisture and crumb)
- ⅓ cup powdered sugar, sifted
- ½ teaspoon baking powder (gluten-free)
- ¼ teaspoon fine sea salt
- ½ cup unsalted butter, softened
- 1 large egg yolk
- 1 teaspoon pure vanilla extract
- 3 tablespoons your choice of filling (see filling suggestions below)
- Optional: coarse sugar for rolling
Instructions
- Prepare the dough: In a medium bowl, whisk together gluten-free flour blend, almond flour, baking powder, powdered sugar, and salt ensuring even distribution.
- Cream butter: Using a stand mixer or hand mixer, beat softened butter until fluffy, about 2-3 minutes. Add the egg yolk and vanilla extract,mixing until fully incorporated.
- Combine wet and dry: Gradually add the dry mixture to the wet, mixing on low speed until a soft, cohesive dough forms. Avoid overmixing to maintain tenderness.
- Chill: Wrap the dough in plastic wrap, flatten into a disk, and refrigerate for 30 minutes to allow the flours to hydrate and firm up the dough for easier shaping.
- Preheat oven: Heat oven to 350°F (175°C) and line a baking sheet with parchment paper.
- Shape cookies: Roll dough into 1-inch balls. For extra texture and sweetness, gently roll each ball in coarse sugar before placing on the baking sheet, spacing 2 inches apart.
- Create thumbprints: Using your thumb or the back of a small spoon, gently press into the center of each ball to create an indentation without breaking the dough.
- Fill and bake: Spoon approximately ½ teaspoon of your chosen filling into each indentation. Bake for 12-15 minutes,until edges are lightly golden and centers set but still soft.
- Cool and enjoy: Transfer cookies to a wire rack to cool fully, allowing flavors to meld and the perfect crumbly texture to develop.
Tips for Success: Gluten-Free Thumbprint Cookies
- Flour blend choice: Select a high-quality gluten-free blend with a mix of rice flour, potato starch, and tapioca for ideal texture. Adding almond flour prevents dryness and boosts richness.
- Dough chill: Don’t skip chilling. It’s crucial for handling and achieving those signature tender edges.
- fillings beyond jam: Explore luscious nut butters like almond or pistachio, silky chocolate ganache, or even a tangy lemon curd to surprise and delight your palate.
- Shaping tip: If dough sticks to your fingers, lightly dust your hands with gluten-free flour or powdered sugar to maintain cookie shape.
- Make-ahead: Dough can be frozen up to a month.Thaw in refrigerator overnight before baking to retain freshness.
serving Suggestions
For an elegant presentation, serve your cookies on a rustic wooden board and garnish with a dusting of powdered sugar or a sprinkle of finely chopped toasted nuts. Pair with a fresh herbal tea or a delicate coffee for an indulgent afternoon treat.Consider layering colors by using a variety of fillings like raspberry jam, smooth peanut butter, and creamy lemon curd-each adding visual and flavorful contrast to your cookie tray.
| Nutrition (Per Cookie) | Calories | Protein | Carbs | Fat |
|---|---|---|---|---|
| Approximate | 110 kcal | 2 g | 13 g | 6 g |

For a deeper dive into gluten-free baking basics and to broaden your flour knowledge, visit Gluten-Free Living. Also, check our related article on best gluten-free baking tips for more inspiration and guidance.
Q&A
Q&A: Perfectly Sweet – A Guide to Gluten-Free Thumbprint Cookies


Q1: What makes thumbprint cookies so special?
A1: Thumbprint cookies are a charming blend of buttery dough and luscious filling, with an inviting indentation-like a little thumbprint-bursting with jam, chocolate, or nut butter. Their size and sweetness make them perfect bite-sized delights that are as fun to make as they are to eat.
Q2: How can I make thumbprint cookies gluten-free without sacrificing flavor or texture?
A2: The secret lies in choosing the right gluten-free flour blend, frequently enough a mix of rice flour, tapioca starch, and potato starch, which mimic the tenderness of traditional flour. Adding a bit of almond flour or coconut flour can enhance moisture and flavor. Don’t forget a good binder like xanthan gum or psyllium husk to give structure and keep the cookies from crumbling.
Q3: Are there any tips to prevent gluten-free thumbprint cookies from cracking?
A3: Absolutely! Make sure your dough is chilled well before baking-this helps it hold its shape and prevents spreading. Also,avoid overbaking; gluten-free cookies tend to dry out faster.Lastly, handle the dough gently and resist the urge to press the indentations too hard, as the dough is more delicate without gluten.
Q4: What fillings work best for gluten-free thumbprint cookies?
A4: The sky’s the limit! Traditional fruit preserves like raspberry or apricot are classics. For a twist, try lemon curd, chocolate ganache, or even a nut butter and honey combo. Just make sure the filling isn’t too runny, or it may seep and burn during baking.
Q5: Can these cookies be made vegan or allergen-pleasant?
A5: Definitely. Substitute butter with coconut oil or dairy-free margarine, and replace eggs with flax or chia seed “eggs” (one tablespoon of seeds plus three tablespoons of water). Be mindful of your chosen fillings as well-many jams and spreads are naturally vegan, but double-check labels to avoid hidden allergens.
Q6: How should gluten-free thumbprint cookies be stored?
A6: Store them in an airtight container at room temperature for up to a week.You can also freeze the baked cookies (without filling) for up to three months. When ready to enjoy, thaw at room temperature and fill with your favorite jam or spread.
Q7: What’s the best way to enjoy these cookies?
A7: Pair freshly baked thumbprint cookies with a cup of tea, coffee, or a glass of cold milk. Their tender crumb and sweet filling offer a perfect balance of texture and flavor, making every bite a tiny celebration.
Ready to bake your perfectly sweet, gluten-free thumbprint cookies? Embrace creativity, follow these tips, and delight in a treat that’s as wholesome as it is delicious!
Key Takeaways
Baking gluten-free thumbprint cookies doesn’t have to be a leap into the unknown-it can be a joyful journey of flavor, texture, and creativity. With the right ingredients and a touch of patience, you can create these perfectly sweet treats that delight everyone, whether they follow a gluten-free lifestyle or simply crave a delicious cookie. So next time you’re in the kitchen,remember: the perfect thumbprint cookie is just a sprinkle of flour and a dollop of jam away from becoming your new favorite indulgence. Happy baking!